(overhaul soon) |
Tag: Help |
||
| (5 intermediate revisions by 3 users not shown) | |||
| Line 1: | Line 1: | ||
| − | <jwplayer media-id="e6VcRq8N" /> |
+ | <jwplayer media-id="e6VcRq8N" />[[File:VisualEditor.png|thumb|300px|The VisualEditor feature in wikis created after march, known as UCP]] |
| ⚫ | |||
| − | {{UCP update}} |
||
| − | [[File:VisualEditor.png|thumb|349px|The VisualEditor in action (UCP)]] |
||
| ⚫ | |||
The '''VisualEditor''' feature allows users to [[Help:Editing|edit]] an article quickly and easily. The editing interface will always reflect how the article will look when published. |
The '''VisualEditor''' feature allows users to [[Help:Editing|edit]] an article quickly and easily. The editing interface will always reflect how the article will look when published. |
||
| + | == UCP == |
||
| + | Unless you have set your [[Help:Editing#Choosing an editor|preferences]] to use the source editor, clicking "Edit" on an article will open the VisualEditor. In the UCP, the VisualEditor and 2017 source editor both turns the page itself into the editor area, rather than load in a separate experience. |
||
| + | |||
| + | === Making an edit === |
||
| + | Once the editor is open, you can begin writing and modifying the text immediately. At the top of the article are an array of formatting tools such as to bold, italicize, underline text, text alignment, and lists. More formatting options are in the dropdown on the far left, allowing the user to switch between regular paragraphs, headings, blockquotes, or preformatted text. The "T" dropdown has yet more specific formatting options such as strikethrough, code blocks, font-size controls, superscript and subscript, etc. |
||
| + | |||
| ⚫ | |||
| + | |||
| + | It's strongly recommended that you add notes in the "describe what you changed" field at the bottom of an editor before clicking "save", as this will help other editors to figure out what you are attempting to do. You can also hit "show changes" for a [[Help:wikitext|wikitext]] difference of your changes before saving. |
||
| + | |||
| + | === Creating a link === |
||
| + | [[File:VE link interface UCP.png|thumb|300px|Link creation dialogue box]] |
||
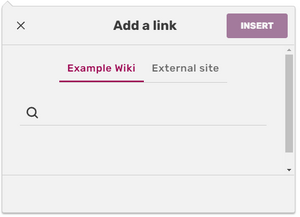
| + | [[Help:Links|Links]] can be added to articles in a variety of ways. In the toolbar there is a chain link icon that can be clicked to open the link creation dialogue box, wherein you can search for an existing article to link or insert an external link. This dialogue box can be opened with the CMD+K (Mac)/CTRL+K (Windows) shortcut, or you can type <code><nowiki>[[</nowiki></code> wherever you wish to add a link to generate the box. If you have text selected when executing the command or clicking the button, that text will be hyperlinked, rather than a new link being created. Hovering over existing links will allow you to edit the display text or modify the link. |
||
| + | |||
| + | === Adding elements === |
||
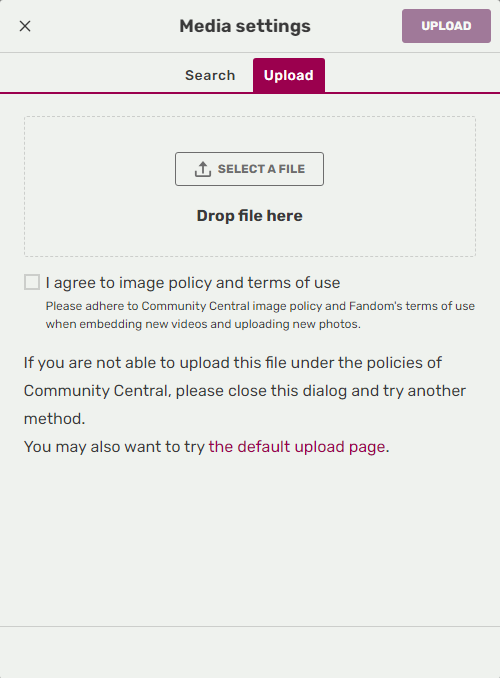
| + | [[Help:Cite|Citations]], media, and other advanced elements can be added to a page via the editor tools. The "Cite" icon, shaped like a book, allows references to be added to an article, whereas the "Image" icon allows for images and videos to be searched for and added to pages. You can also upload images this way, or via the "mass upload" icon. |
||
| + | |||
| + | [[File:File insert advanced UCP.png|thumb|300px|Video manipulation dialogue box]] |
||
| + | |||
| + | Once added, clicking any of these elements will generate an "edit" dialogue box wherein they may be manipulated. Images and videos can be positioned, captions or [[wikipedia:alt attribute|alt text]] added, borders around them controlled, and more. Citations can have their contents modified or added to [[Help:Cite#Grouped references|groups]]. |
||
| + | |||
| + | For more control over the position and formatting of images, see [[Help:Wikitext#Image formatting]]. |
||
| + | |||
| + | === Insert === |
||
| + | The "insert" dropdown allows for the addition of more advanced objects to an article: |
||
| + | *'''Infobox''' — Displays a list of [[Help:Infoboxes|Portable Infoboxes]], which the user may insert into the article. There is also a link to make a brand new infobox. |
||
| + | *'''Template''' — Allows the user to search through the entire template namespace for one to insert into a page. |
||
| + | *'''Table''' — Adds a basic table that can be manipulated. |
||
| + | *'''Comment''' — Adds a note visible only to other editors. |
||
| ⚫ | |||
| + | **'''Chemical formulae''' |
||
| + | **'''Mathematical formulae''' |
||
| + | **'''[[Help:Galleries, Slideshows, and Sliders|Galleries]]''' |
||
| + | **'''Code blocks''' |
||
| + | **'''Signatures''' |
||
| + | **A '''reference list''' for [[Help:Cite|citations]]. |
||
| + | |||
| + | === Article options === |
||
| + | [[File:VE article settings UCP.png|thumb|300px|Options dialogue box]] |
||
| + | The gear icon on the far right of the toolbar has a list of opens that open different panes in the options dialogue box. Here, you can manipulate article [[Help:Category|categories]], manipulate the [[Help:Table of contents|Table of contents]] and [[Help:Redirect|Redirects]], control the [[Help:interlanguage link|interlanguage links]], view the templates used on the article, and more. |
||
| + | |||
| + | One of the last few tools available are the find and replace tool, which can be opened from the options dropdown or via the CMD+F (Mac)/CTRL+F (Windows) command. In the very far left of the editor, there are also helpful links to [[Special:WhatLinksHere]], Special:RecentChangesLinked, [[Special:SpecialPages]], and another link to upload files. |
||
| + | |||
| + | === Switching to source editor === |
||
| + | Linked prominently at the very top of the article, under the "edit page" text, is a dropdown where you can find keyboard shortcuts, read an [[mw:Help:VisualEditor/User guide|advanced user guide]], and switch to [Help:Source edit mode|source editor]]. Source editor allows you to view the underlying [[Help:wikitext|wikitext]] at work in the article. |
||
| + | |||
| + | == Legacy == |
||
Unless you have set your [[Help:Editing#Choosing_an_editor|preferences]] to use the classic editor, the "Edit" button on an article page will start VisualEditor. Unlike the [[Help:Classic editor|classic editor]] — sometimes called the Rich Text Editor (RTE) or Source Editor — VisualEditor does not reload the entire page in your browser; it simply turns the article area into an editor. The editing toolbar appears at the top of the article space, and the cursor appears at the beginning of the text. |
Unless you have set your [[Help:Editing#Choosing_an_editor|preferences]] to use the classic editor, the "Edit" button on an article page will start VisualEditor. Unlike the [[Help:Classic editor|classic editor]] — sometimes called the Rich Text Editor (RTE) or Source Editor — VisualEditor does not reload the entire page in your browser; it simply turns the article area into an editor. The editing toolbar appears at the top of the article space, and the cursor appears at the beginning of the text. |
||
| − | == Making an edit == |
+ | === Making an edit === |
| − | After clicking "Edit", simply begin typing the text that you want to add. The toolbar allows for text modifications like [[File:VE Bold button.png |
+ | After clicking "Edit", simply begin typing the text that you want to add. The toolbar allows for text modifications like [[File:VE Bold button.png|link=]] '''bold''', [[File:VE Italic button.png|link=]] ''italic'' and the selection of various text sizes (headings and sub-headings). Additional format options can be found under the style dropdown ([[File:VE format button.png|link=]]). It includes the following buttons: |
* <sub>Subscript</sub> |
* <sub>Subscript</sub> |
||
| Line 22: | Line 67: | ||
Note that wikitext is not supported in the VisualEditor. See [[#Accessing source mode]]. |
Note that wikitext is not supported in the VisualEditor. See [[#Accessing source mode]]. |
||
| − | == Creating a link == |
+ | === Creating a link === |
The toolbar also has the [[File:VE Link button.png|link=]] link tool that's used to link words or phrases to other pages on the same Fandom site. To create a [[Help:Links|link]], either: |
The toolbar also has the [[File:VE Link button.png|link=]] link tool that's used to link words or phrases to other pages on the same Fandom site. To create a [[Help:Links|link]], either: |
||
| Line 33: | Line 78: | ||
[[File:VE-Insert-Media.png|thumb|250px|The media insertion tool, with the cart on the right side]] |
[[File:VE-Insert-Media.png|thumb|250px|The media insertion tool, with the cart on the right side]] |
||
| − | == Media (images and videos) == |
+ | === Media (images and videos) === |
[[File:VE-UploadNewImage.png|thumb|250px|After uploading a new image]] |
[[File:VE-UploadNewImage.png|thumb|250px|After uploading a new image]] |
||
You can add videos, images, and galleries by clicking the media buttons on the toolbar. |
You can add videos, images, and galleries by clicking the media buttons on the toolbar. |
||
| Line 45: | Line 90: | ||
When ready, click "Apply changes" in the lower right. The items will be inserted into the article as thumbnails. The default width for images is 220px, and for videos it is 330px. You can resize media and add captions after adding them to the article. |
When ready, click "Apply changes" in the lower right. The items will be inserted into the article as thumbnails. The default width for images is 220px, and for videos it is 330px. You can resize media and add captions after adding them to the article. |
||
| − | === Manipulating media === |
+ | ==== Manipulating media ==== |
Resize media by selecting the image and using your mouse to drag the corners. If you hold down the Shift key when dragging, it will be resized in steps of 10px. |
Resize media by selecting the image and using your mouse to drag the corners. If you hold down the Shift key when dragging, it will be resized in steps of 10px. |
||
| Line 54: | Line 99: | ||
For more control over the position and formatting of images, see [[Help:Wikitext#Image formatting]]. |
For more control over the position and formatting of images, see [[Help:Wikitext#Image formatting]]. |
||
| − | == Accessing source mode == |
+ | === Accessing source mode === |
[[File:Visual Editor Source Mode.png|thumb|250px|The source mode for the Visual Editor]] |
[[File:Visual Editor Source Mode.png|thumb|250px|The source mode for the Visual Editor]] |
||
On the toolbar's settings menu ([[File:VE-PageSettingsButton.png|link=]]), choose the [[File:VE-SourceMenu.png|link=]] Source Editor option to view the page's [[Help:Wikitext|wikitext]]. If you make any changes, click the "Apply changes" button in the lower right, and you'll be returned to the VisualEditor with the changes reflected there. |
On the toolbar's settings menu ([[File:VE-PageSettingsButton.png|link=]]), choose the [[File:VE-SourceMenu.png|link=]] Source Editor option to view the page's [[Help:Wikitext|wikitext]]. If you make any changes, click the "Apply changes" button in the lower right, and you'll be returned to the VisualEditor with the changes reflected there. |
||
| Line 62: | Line 107: | ||
[[File:Visual Editor Selected Object.png|250px|thumb|An object selected by clicking on the desired object to edit]] |
[[File:Visual Editor Selected Object.png|250px|thumb|An object selected by clicking on the desired object to edit]] |
||
| ⚫ | |||
| ⚫ | |||
| + | |||
| + | === Other options === |
||
[[File:Rachel VE template.png|thumb|250px|The VisualEditor's template tool]] |
[[File:Rachel VE template.png|thumb|250px|The VisualEditor's template tool]] |
||
Other abilities include, but are not limited to: |
Other abilities include, but are not limited to: |
||
| Line 75: | Line 122: | ||
** Edit existing references by selecting the references section and clicking the edit button, shown over the upper right of the section. |
** Edit existing references by selecting the references section and clicking the edit button, shown over the upper right of the section. |
||
| − | == |
+ | === Editor support and updates === |
| ⚫ | |||
| − | |||
| − | == Editor support and updates == |
||
[[File:VE-ClassicEditor.png|thumb|The Classic editor option still allows access to all existing editing tools]] |
[[File:VE-ClassicEditor.png|thumb|The Classic editor option still allows access to all existing editing tools]] |
||
The VisualEditor is available for the main, User, Project and Category namespaces, and is only active on the default skin. |
The VisualEditor is available for the main, User, Project and Category namespaces, and is only active on the default skin. |
||
Revision as of 14:23, 12 October 2020
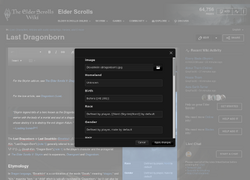
The VisualEditor feature in wikis created after march, known as UCP
The VisualEditor in mobile (UCP)
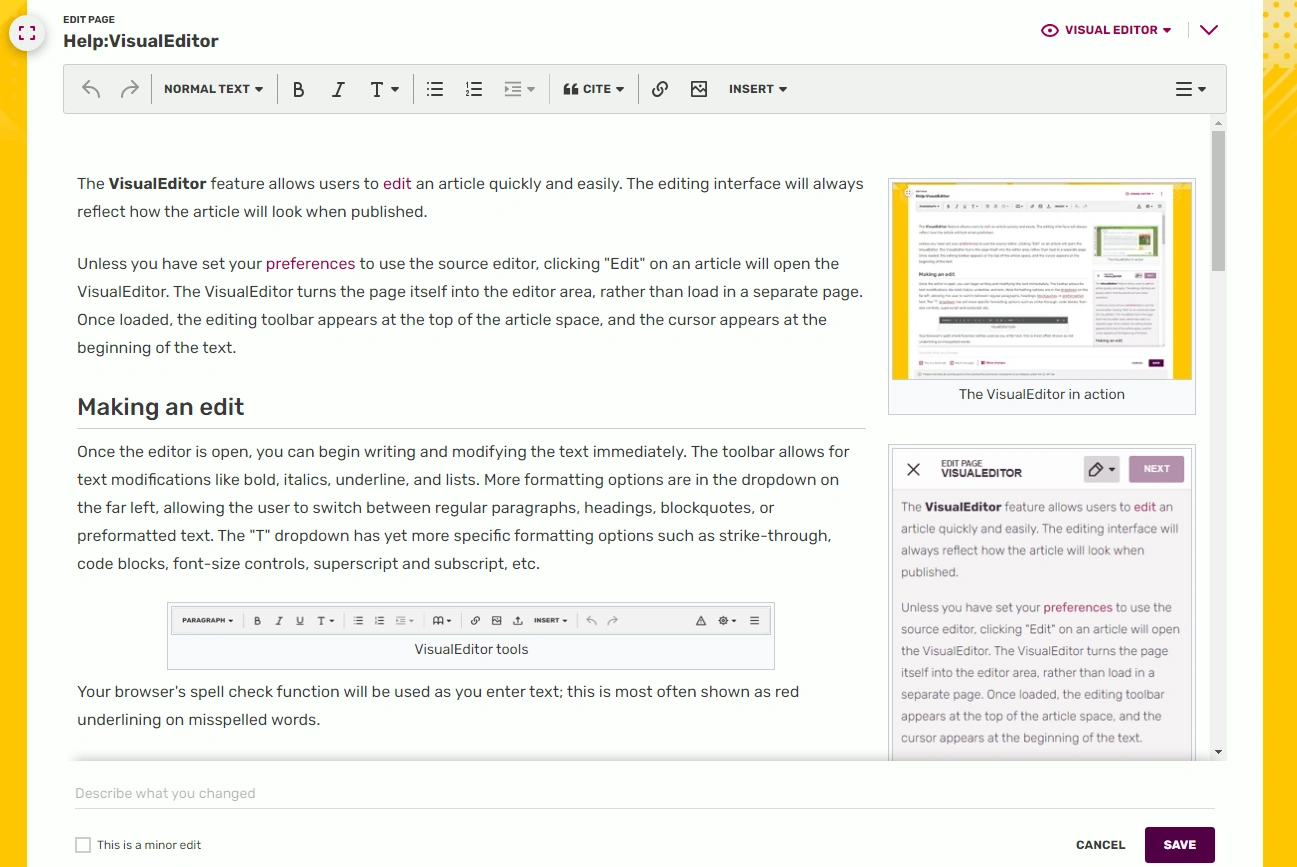
The VisualEditor feature allows users to edit an article quickly and easily. The editing interface will always reflect how the article will look when published.
UCP
Unless you have set your preferences to use the source editor, clicking "Edit" on an article will open the VisualEditor. In the UCP, the VisualEditor and 2017 source editor both turns the page itself into the editor area, rather than load in a separate experience.
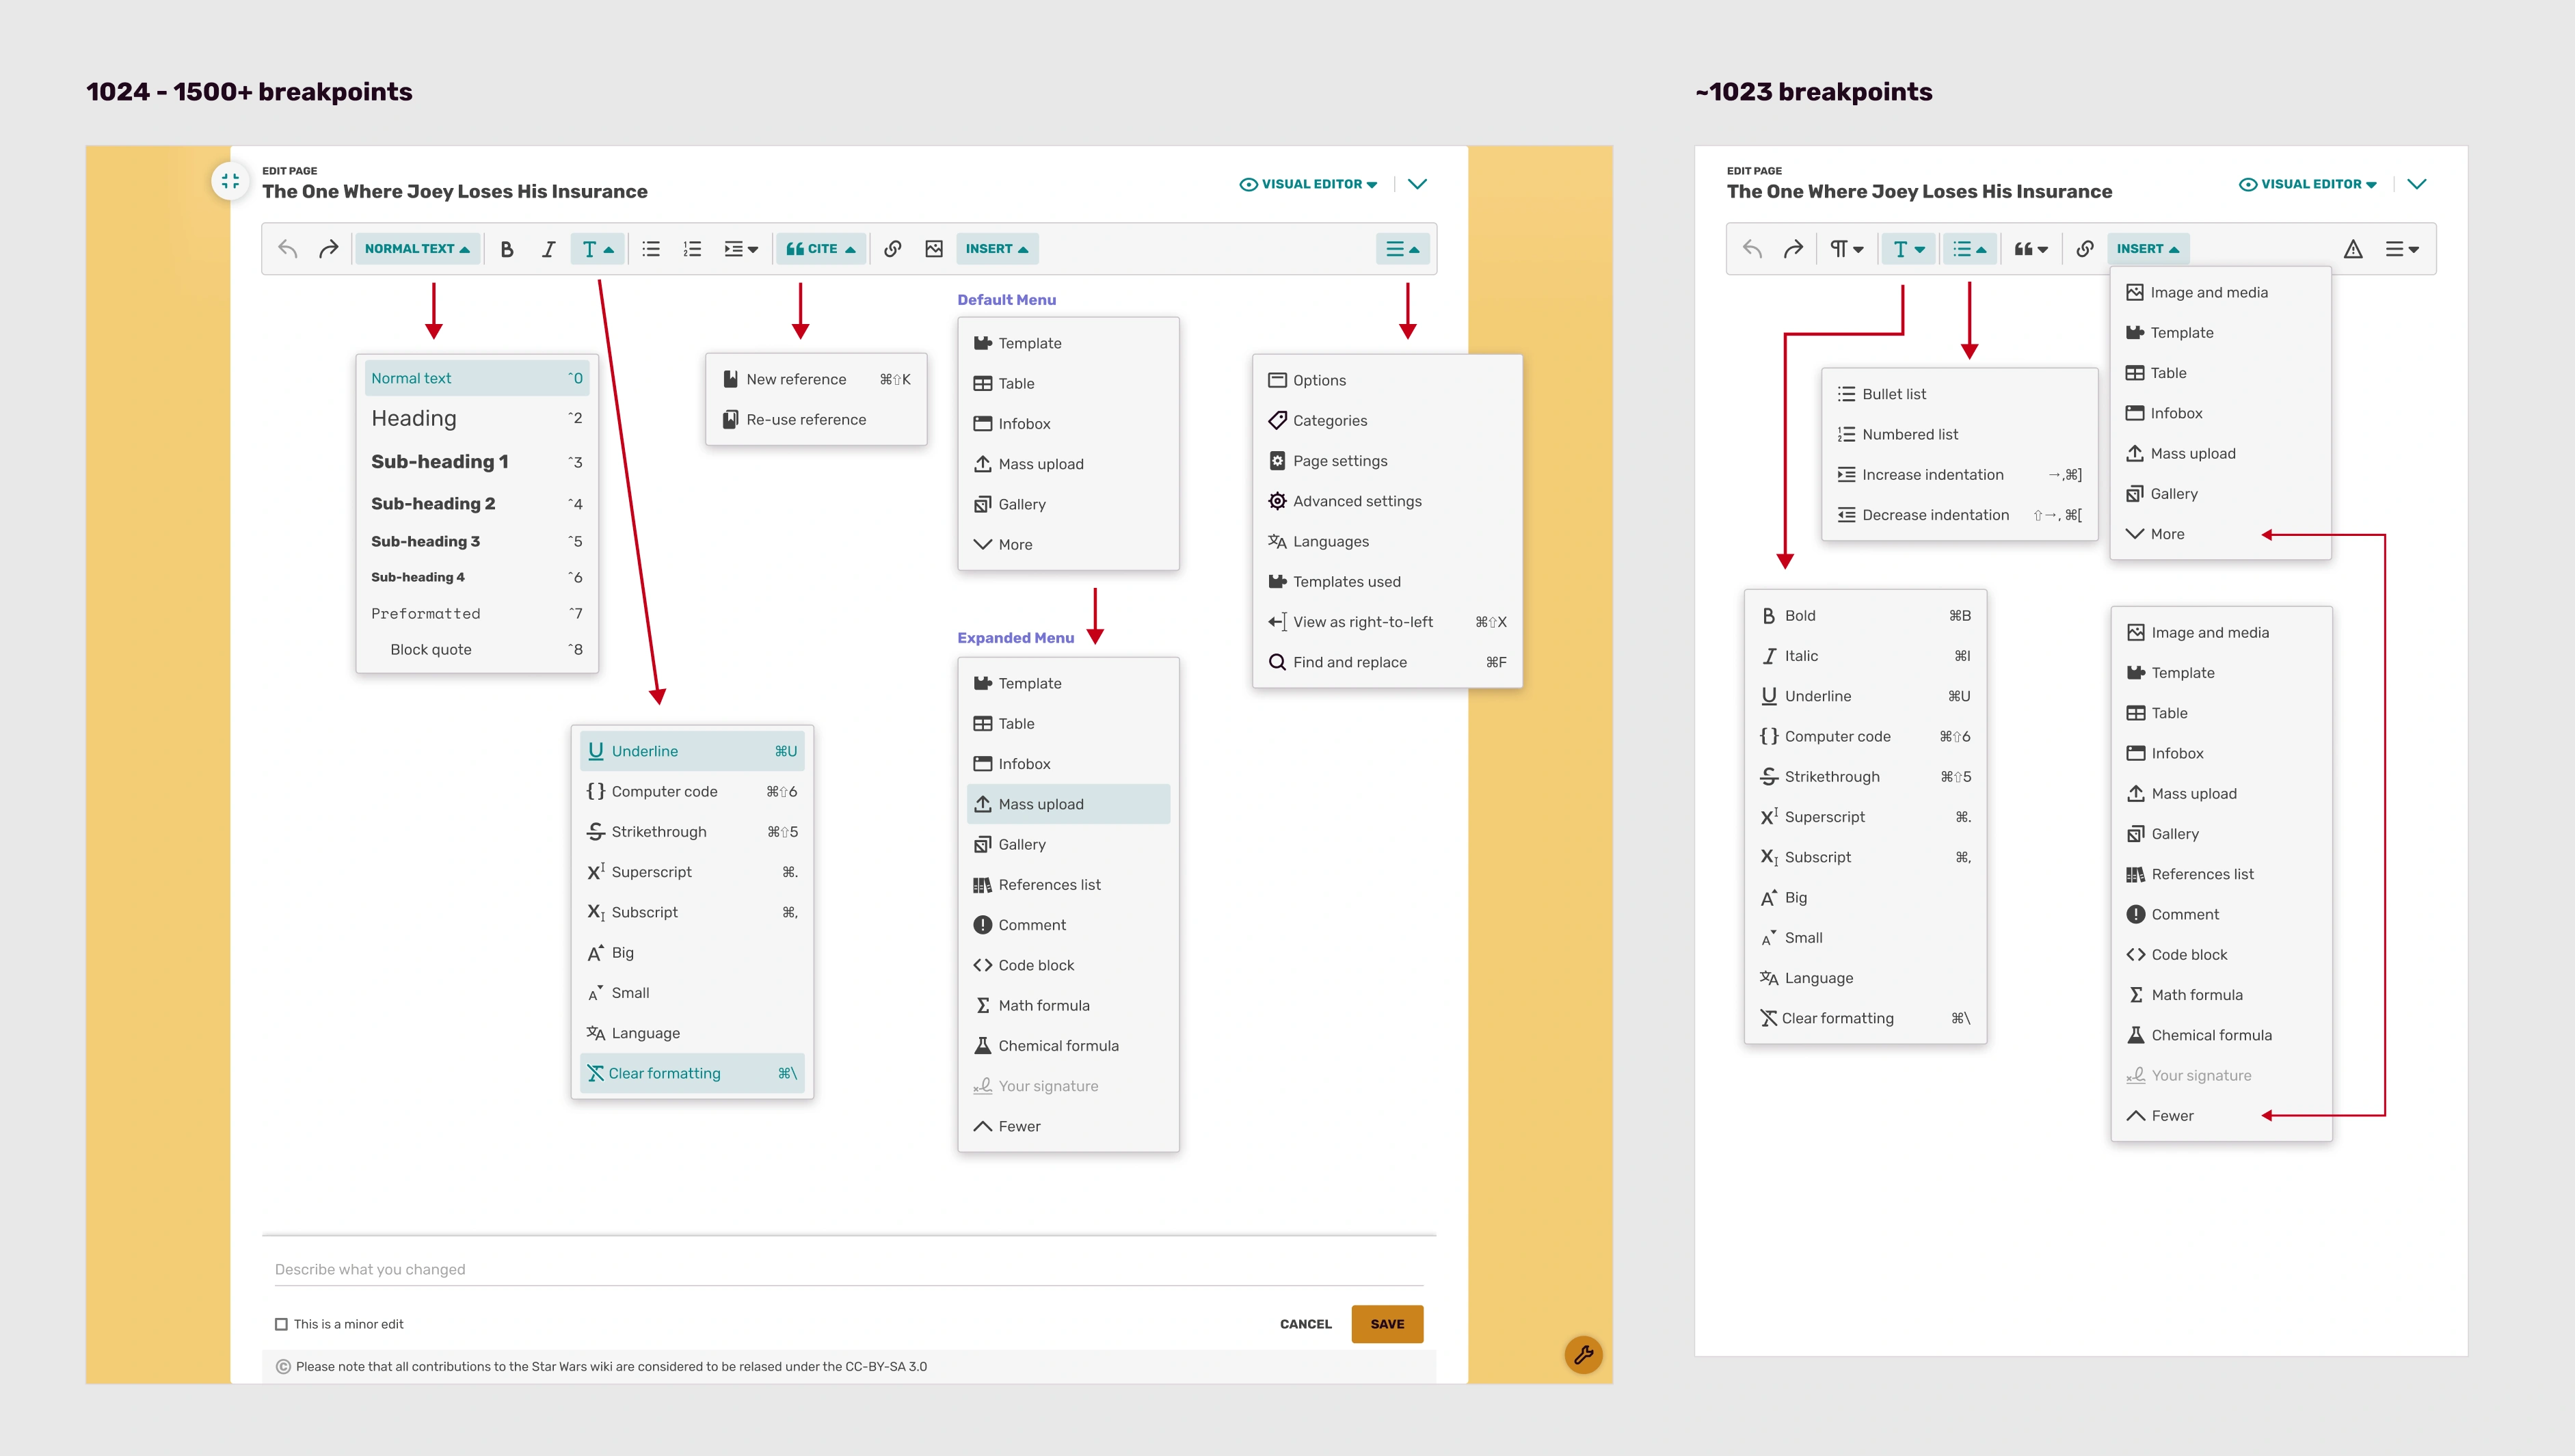
Making an edit
Once the editor is open, you can begin writing and modifying the text immediately. At the top of the article are an array of formatting tools such as to bold, italicize, underline text, text alignment, and lists. More formatting options are in the dropdown on the far left, allowing the user to switch between regular paragraphs, headings, blockquotes, or preformatted text. The "T" dropdown has yet more specific formatting options such as strikethrough, code blocks, font-size controls, superscript and subscript, etc.
It's strongly recommended that you add notes in the "describe what you changed" field at the bottom of an editor before clicking "save", as this will help other editors to figure out what you are attempting to do. You can also hit "show changes" for a wikitext difference of your changes before saving.
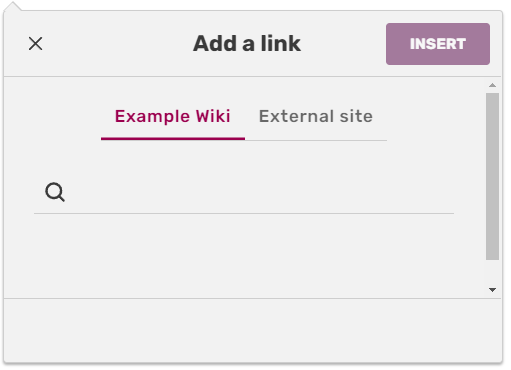
Creating a link
Link creation dialogue box
Links can be added to articles in a variety of ways. In the toolbar there is a chain link icon that can be clicked to open the link creation dialogue box, wherein you can search for an existing article to link or insert an external link. This dialogue box can be opened with the CMD+K (Mac)/CTRL+K (Windows) shortcut, or you can type [[ wherever you wish to add a link to generate the box. If you have text selected when executing the command or clicking the button, that text will be hyperlinked, rather than a new link being created. Hovering over existing links will allow you to edit the display text or modify the link.
Adding elements
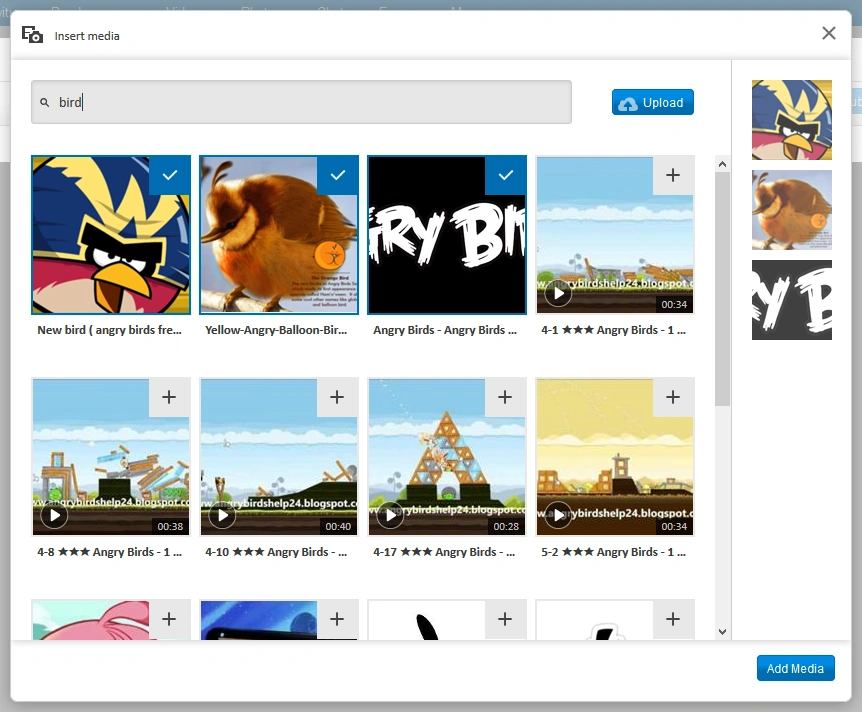
Citations, media, and other advanced elements can be added to a page via the editor tools. The "Cite" icon, shaped like a book, allows references to be added to an article, whereas the "Image" icon allows for images and videos to be searched for and added to pages. You can also upload images this way, or via the "mass upload" icon.

Video manipulation dialogue box
Once added, clicking any of these elements will generate an "edit" dialogue box wherein they may be manipulated. Images and videos can be positioned, captions or alt text added, borders around them controlled, and more. Citations can have their contents modified or added to groups.
For more control over the position and formatting of images, see Help:Wikitext#Image formatting.
Insert
The "insert" dropdown allows for the addition of more advanced objects to an article:
- Infobox — Displays a list of Portable Infoboxes, which the user may insert into the article. There is also a link to make a brand new infobox.
- Template — Allows the user to search through the entire template namespace for one to insert into a page.
- Table — Adds a basic table that can be manipulated.
- Comment — Adds a note visible only to other editors.
- Other options:
Article options
Options dialogue box
The gear icon on the far right of the toolbar has a list of opens that open different panes in the options dialogue box. Here, you can manipulate article categories, manipulate the Table of contents and Redirects, control the interlanguage links, view the templates used on the article, and more.
One of the last few tools available are the find and replace tool, which can be opened from the options dropdown or via the CMD+F (Mac)/CTRL+F (Windows) command. In the very far left of the editor, there are also helpful links to Special:WhatLinksHere, Special:RecentChangesLinked, Special:SpecialPages, and another link to upload files.
Switching to source editor
Linked prominently at the very top of the article, under the "edit page" text, is a dropdown where you can find keyboard shortcuts, read an advanced user guide, and switch to [Help:Source edit mode|source editor]]. Source editor allows you to view the underlying wikitext at work in the article.
Legacy
Unless you have set your preferences to use the classic editor, the "Edit" button on an article page will start VisualEditor. Unlike the classic editor — sometimes called the Rich Text Editor (RTE) or Source Editor — VisualEditor does not reload the entire page in your browser; it simply turns the article area into an editor. The editing toolbar appears at the top of the article space, and the cursor appears at the beginning of the text.
Making an edit
After clicking "Edit", simply begin typing the text that you want to add. The toolbar allows for text modifications like ![]() bold,
bold, ![]() italic and the selection of various text sizes (headings and sub-headings). Additional format options can be found under the style dropdown (
italic and the selection of various text sizes (headings and sub-headings). Additional format options can be found under the style dropdown (![]() ). It includes the following buttons:
). It includes the following buttons:
- Subscript
- Superscript
Strikethrough- Underline
- Decreased indention
- Increased indention
- Clear styling
Your browser's spellcheck function will be used as you enter text; this is most often shown as red underlining on misspelled words.
Note that wikitext is not supported in the VisualEditor. See #Accessing source mode.
Creating a link
The toolbar also has the ![]() link tool that's used to link words or phrases to other pages on the same Fandom site. To create a link, either:
link tool that's used to link words or phrases to other pages on the same Fandom site. To create a link, either:
- Click the link button without selecting any text - you can then type in the intended destination in the tool, and this will be used as the link text.
- Insert 2 square brackets, then type in the intended destination in the tool.
- Highlight some text then click the link button - this will keep the highlighted text, but you can point the link itself at a different destination.
If the destination article already exists on Fandom, you can simply start typing the name of the page and a list of suggestions will appear. When you're done, simply hit enter or click elsewhere on the screen to dismiss the dialog. Click the linked text to access the dialog again for further changes.
The media insertion tool, with the cart on the right side
Media (images and videos)

After uploading a new image
You can add videos, images, and galleries by clicking the media buttons on the toolbar.
- To upload an image, drag and drop it onto the dialog, or click the "Upload" button.
- To add a new video, paste a URL from a supported site into the field at the top of the video tool.
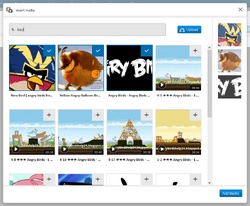
- Search the community for existing images and videos by entering search terms into the field at the top of the media tool. Results will be displayed below the field. Click on one or more images or videos to add them to the 'cart'. Items you've added to the cart will show a check mark
 in the upper right corner (even when they appear in subsequent search results).
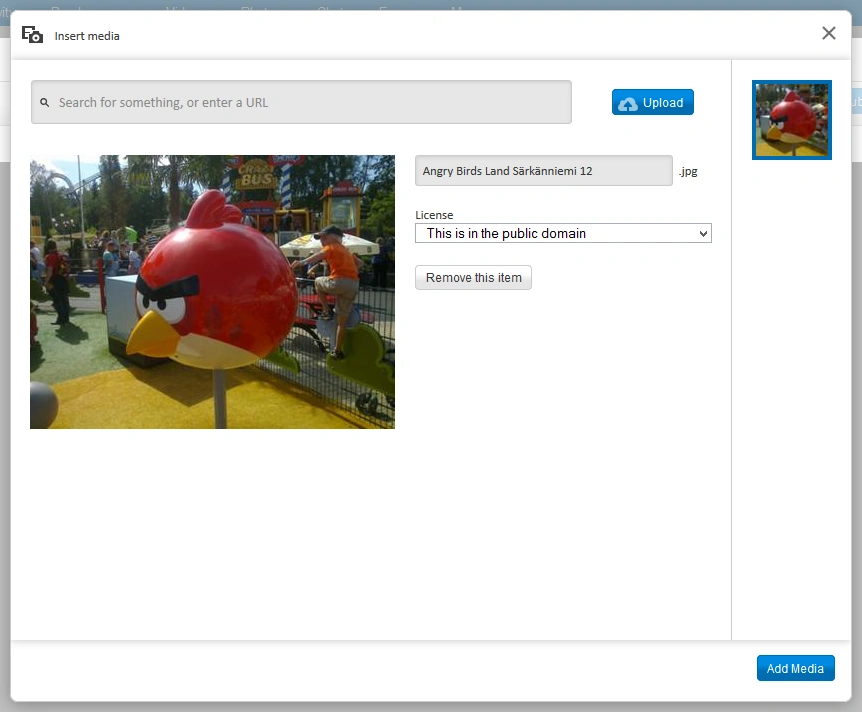
Once chosen, the image or video will be added to your cart, displayed on the right side. When clicked, more detail about the image or video will be displayed in the center, along with options such as the ability to change the filename and licensing, or to remove the item from the cart.
When ready, click "Apply changes" in the lower right. The items will be inserted into the article as thumbnails. The default width for images is 220px, and for videos it is 330px. You can resize media and add captions after adding them to the article.
Manipulating media
Resize media by selecting the image and using your mouse to drag the corners. If you hold down the Shift key when dragging, it will be resized in steps of 10px.
Move media by dragging the image where you want in the article - it will snap to locations above and below paragraphs of text, indicated by a horizontal line.
Edit media captions by selecting the image and clicking the edit media button, normally shown over the upper right of the image.
For more control over the position and formatting of images, see Help:Wikitext#Image formatting.
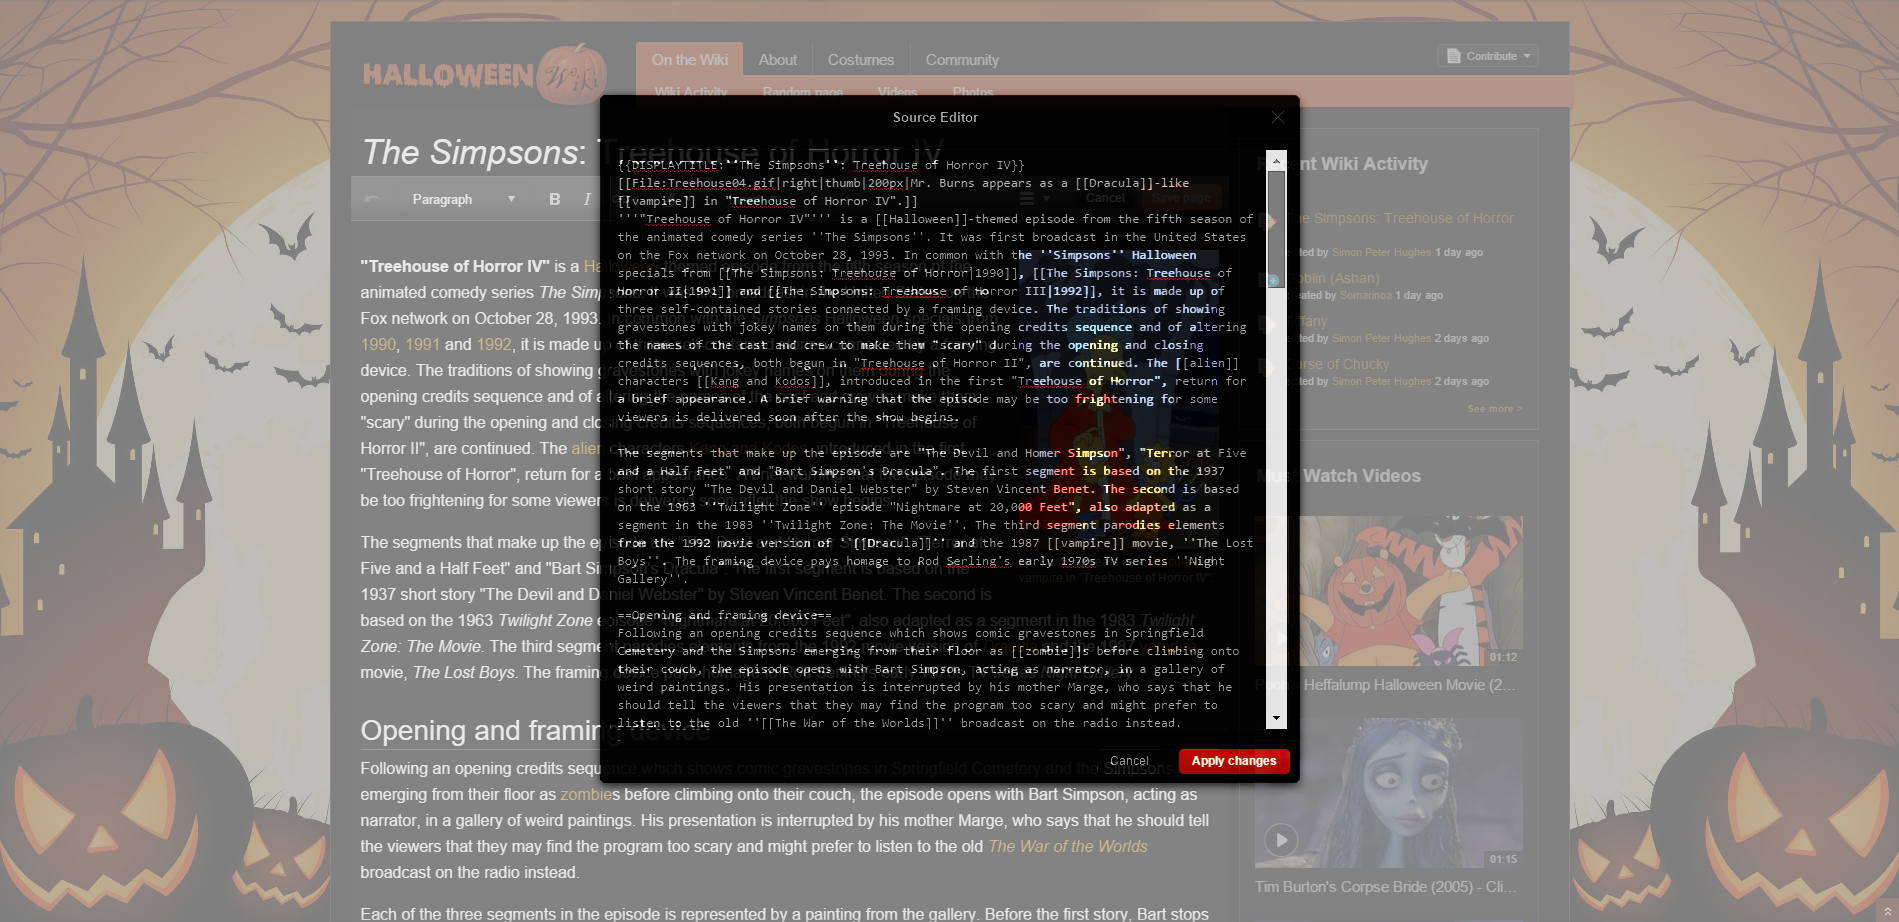
Accessing source mode

The source mode for the Visual Editor
On the toolbar's settings menu (![]() ), choose the
), choose the ![]() Source Editor option to view the page's wikitext. If you make any changes, click the "Apply changes" button in the lower right, and you'll be returned to the VisualEditor with the changes reflected there.
Source Editor option to view the page's wikitext. If you make any changes, click the "Apply changes" button in the lower right, and you'll be returned to the VisualEditor with the changes reflected there.
You can also quickly open the source editor via a keyboard shortcut. See Help:Keyboard shortcuts for more info.


An object selected by clicking on the desired object to edit
- Tip: If you're trying to bring up the Source Editor and it has problems loading, try hitting the ESC key to close it and try again.
Other options

The VisualEditor's template tool
Other abilities include, but are not limited to:
- Add a new template using the Template option on the toolbar's Insert menu.
- If you're specifically looking for infoboxes, you can use the Infobox option, which lists all portable infoboxes on your community.
- Edit an existing template by clicking it, then clicking the Edit button that appears.
- Within the template tool, you can search for specific items to change using the parameter's name (e.g. 'age') or the existing value (e.g. '24').
- If you're specifically looking for infoboxes, you can use the
- Create numbered or bulleted lists by choosing the list icons.
- Update article categories by clicking the settings menu in the toolbar, then choosing 'Categories'.
- Add references by choosing the Reference option on the Insert menu in the toolbar.
- Edit existing references by selecting the references section and clicking the edit button, shown over the upper right of the section.
Editor support and updates

The Classic editor option still allows access to all existing editing tools
The VisualEditor is available for the main, User, Project and Category namespaces, and is only active on the default skin.
Any element that you can't currently modify using VisualEditor will be obscured with a striped overlay and a tooltip stating that it's not currently editable. To do some things, you'll still need to use the source dialog, or the classic editing experience.
See here for an explanation of Fandom's editor user preferences. Anonymous users will generally always see the VisualEditor by default.
VisualEditor is not supported in Internet Explorer at this time. Other standard browsers are supported.
Next steps
- Learn how to create a new article.
- Learn how to use the classic editor
Further help and feedback
- Browse and search other help pages at Help:Contents
- Check Fandom Community Central for sources of further help and support
- Check Contacting Fandom for how to report any errors or unclear steps in this article