(Adding PT link) Tag: sourceedit |
No edit summary Tags: Help sourceedit |
||
| Line 10: | Line 10: | ||
# Many users prefer to have their bot account include the word "bot", to signify that they are a bot. |
# Many users prefer to have their bot account include the word "bot", to signify that they are a bot. |
||
| − | # On the user page of this account; post info about the bot's owner and all the needed details (mentioned [[Help:Bots|here]]). To make it simple you can use this template: [[Template:Bot]] (just copy it on your wiki). |
+ | # On the user page of this account; post info about the bot's owner and all the needed details (mentioned [[Help:Bots|here]]). To make it simple you can use this template: [[homepage:w:Template:Bot|Template:Bot]] (just copy it on your wiki). |
# [[Special:Contact/general|Contact]] Fandom staff and request a bot flag for this account. This stops your bot showing up in RecentChanges and leaderboards |
# [[Special:Contact/general|Contact]] Fandom staff and request a bot flag for this account. This stops your bot showing up in RecentChanges and leaderboards |
||
Revision as of 20:08, 21 April 2017
This tutorial will lead you through the process of creating a bot using the AutoWikiBrowser program through the example of changing a word on pages of the fandubbing wiki.
There is a more in-depth user manual on Wikipedia.
Step 1: Create your bot account
Note: If you already have a bot account, skip this step
Your bot must use a separate account (for more info check this article).
- Many users prefer to have their bot account include the word "bot", to signify that they are a bot.
- On the user page of this account; post info about the bot's owner and all the needed details (mentioned here). To make it simple you can use this template: Template:Bot (just copy it on your wiki).
- Contact Fandom staff and request a bot flag for this account. This stops your bot showing up in RecentChanges and leaderboards
Step 2: Get the program
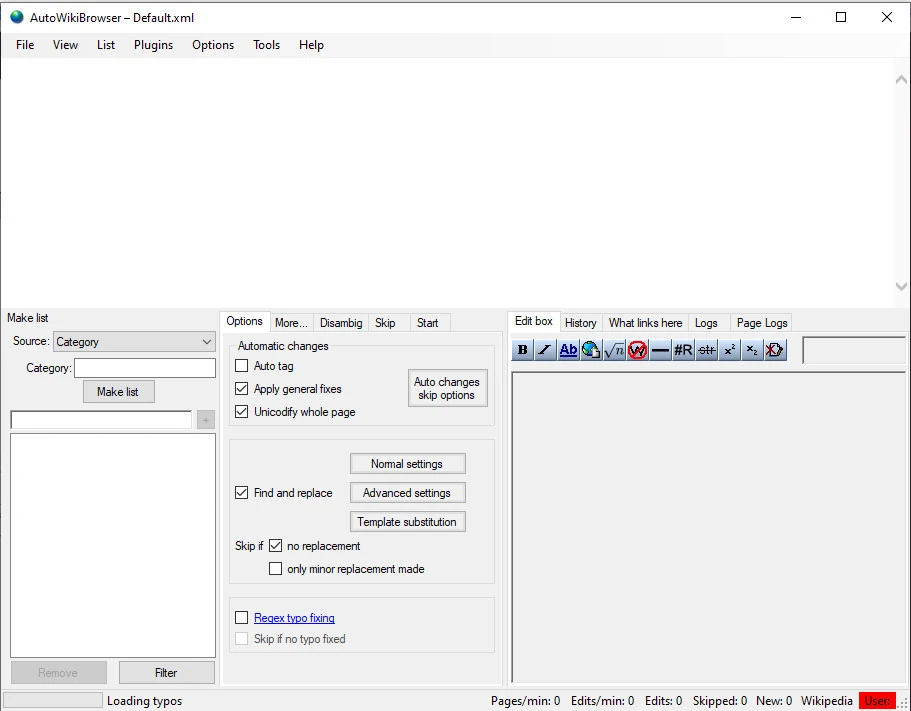
Download AutoWikiBrowser to your computer. The basic operation of the software is:
- Launch AutoWikiBrowser
- Log in to the bot account using AutoWikiBrowser
- Specify what the bot is to do
- Specify what pages the bot should do
Note that AutoWikiBrowser doesn't have to be ran in bot mode. It can also be ran in "semi-automated" mode, where you check each edit and automatically open the new page after saving. This may be handy if you want to edit a bunch of pages one after another.
Step 3: Learn how to use the program
In this example we will set up our bot and then use it to replace a short phrase on many pages of our wiki.
Choosing a community
- Launch AutoWikiBrowser.
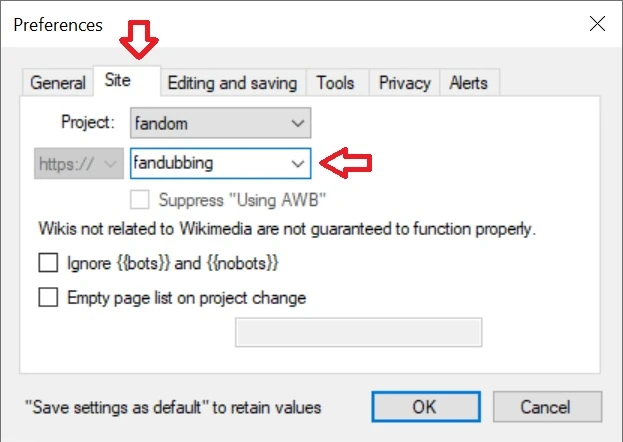
- Go to Options → Preferences → Site
- From the drop-down list choose "Wikia" and then type the URL of your community. In the example, this community is "pl.fandubbing".
- When you are done, save changes with the OK button.
Your program may freeze for few seconds. After this on the bottom bar you will see that program is synchronized with the given community:
Logging in
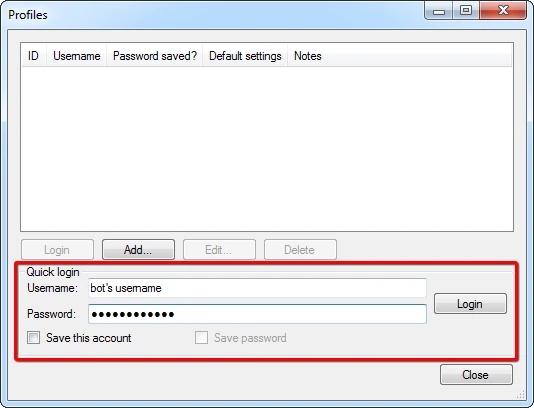
Once you have chosen a wiki, you must log into your bot account. In the example the bot is named "fandubbing.wikia" after the wiki it runs on.
- Go to File → Log in/Profiles...
- Enter the bot's username and password
- Press "Login"
Your bottom bar will now show that you are fully logged in:


Now the bot is set and ready to work!
Note: Some wikis use a check page that may limit login to specific usernames as well as whether the bot status is false (human semi-automatic editing) and/or true (fully automatic editing).
Choosing edit options
In this example we will use the bot to replace all badly entered artist names.
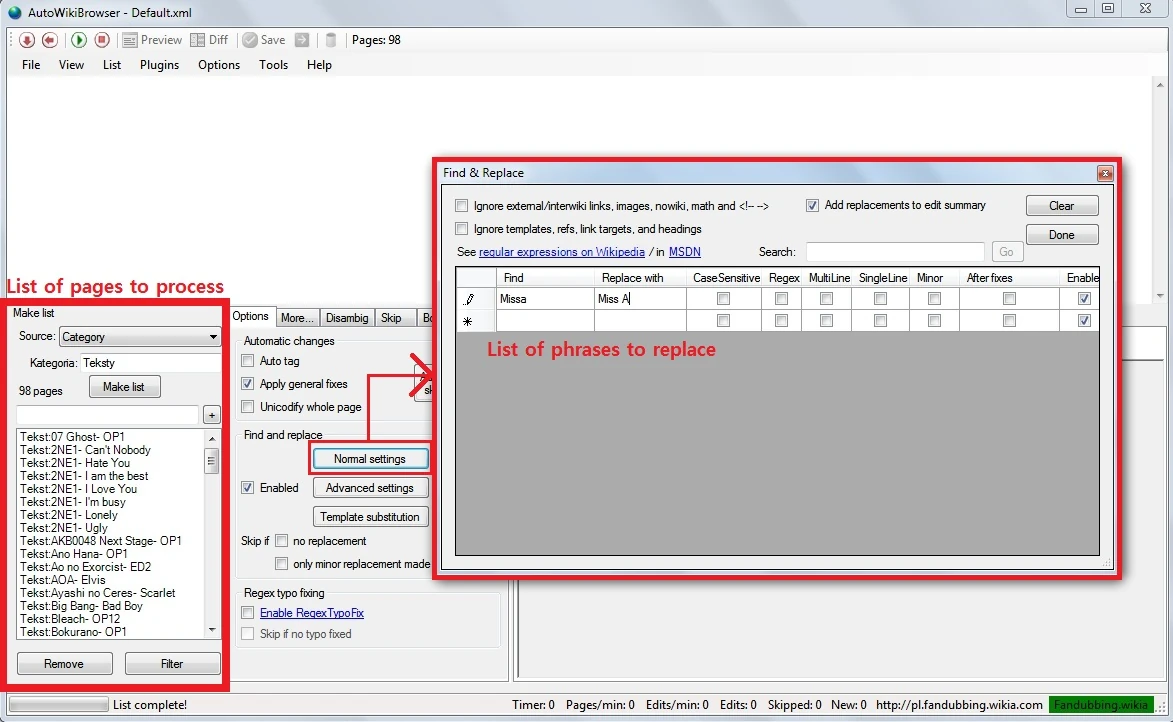
- Make a list of pages to edit. For example, you can choose all the pages in a given category.
- Choose the edition options from the middle panel. In this example in the "Find and Replace" section we used "Normal Settings" and entered the phrase and its replacement.
TIP: To make list of all pages in the main namespace, in the "Make List" panel choose "Special Page" as the source. When you press "Make List" an additional window should appear. Choose "All Pages", select namespace "Main:" and press OK.
TIP: Untick all settings you are not sure of! To learn more about what all of those do, see the manual.
Starting the edits

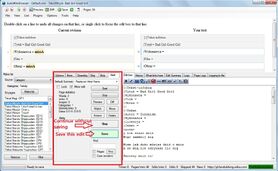
When you are ready to begin go to the "Start" tab from the middle section..
- Enter the default edit summary. It will be shown as summary of each edit.
- Press Start!
The program will start searching through the previously listed pages. When it finds the phrase it searches for, it will apply all previously defined changes and show them in the top window.
In case you are not satisfied with the changes you can edit the page using the edit box on the right.
When you are done press "Save" to save changes. If the page doesn't need to be edited, press "Skip" to leave the page unchanged.
TIP: In "Skip Options" tab check the option "Skip if no changes are made". This will cause AutoWikiBrowser to automatically skip pages that won't have any changes.
Fully automatic bot
The example above shows semi-automatic editing. It is quite fast and safe, as you can control each change being made. However, if you wish you can go to "Bots" tab and check "Auto save" option.
AutoWikiBrowser will now save each change automatically, without any confirmation. Use this option with care, running a few semi-automatic test edits before turning auto save on to test if the bot is functioning properly is recommended.