(switch to using system messages for the names of buttons and sections) Tags: Source edit Help |
m (Remove red links.) Tag: Help |
||
| Line 28: | Line 28: | ||
* Learn about [[Help:Notifications|notifications]] |
* Learn about [[Help:Notifications|notifications]] |
||
* Learn about [[Help:Recent changes|recent changes]] |
* Learn about [[Help:Recent changes|recent changes]] |
||
| − | * Learn how to edit the [[Help:Community messages|community messages]] |
||
== Further help and feedback == |
== Further help and feedback == |
||
Revision as of 23:05, 27 February 2021
The toolbar is a bar on the bottom of your screen that follows you as you scroll through any page on Fandom. It follows you from community to community as well.
When you are logged in, it lets you place a number of your most commonly used tools - the edit, rename, history, and delete pages, to name a few - right on the toolbar so they are only a click away. Tools you select will appear on the toolbar when they're actively available for use (for example, "Delete" will not show up when you are on Special:RecentChanges).
Step-by-step
- Your toolbar can be found at the bottom of your screen and it will follow you as you scroll. It can be shown or hidden by clicking the arrow in the bottom-right corner of the screen.

- Your toolbar is very customizable. Clicking "Customize" brings up a dialog box with the Add A Tool search field on the top and the Toolbar List on the bottom. It also has all of the system defaults, to help you if you delete one and then forget how to get it back.
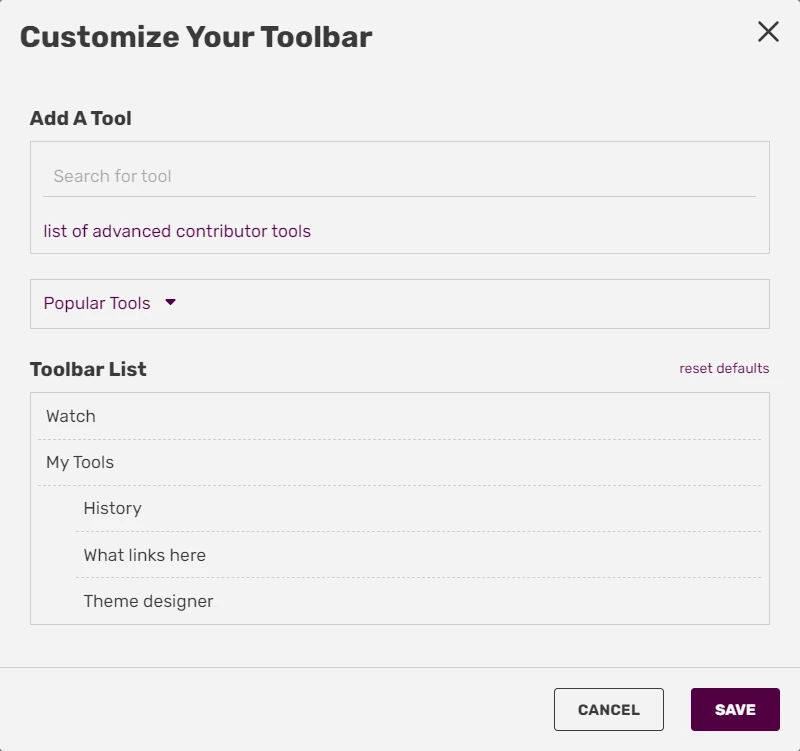
- You can use the "Add A Tool" search box to begin selecting tools. Simply type in the name of a page you want to use and click it in the drop down menu, which will add it to the Toolbar List. For example, typing in "History" will produce a history link in the search box, which you can then click on to add to the "Toolbar List".
- You can also click "Popular Tools" to produce a list of commonly used tools, and click the "list of advanced contributor tools" link in the upper right to see a list of all of the tools available.
- Each item you put into your Toolbar List can be altered or removed. If you hover over the name in your Toolbar List, you will see a pencil icon, a trash can icon, and two arrows. This allows you to rename the item (pencil icon), delete the item (trash can), or move it up and down (arrow icons).
- To save your customization, click the "Save" button.
- If you make a mistake, you can click the "Cancel" button to exit without saving your changes.
- The "reset defaults" link resets the toolbar and My Tools folder to the system default.
- If you add more tools to the toolbar than space allows, a "more…" menu will appear in front of the My Tools menu with the extra tools.
- You can add tools to this menu in addition to right on the toolbar itself via the toolbar customization dialog.
- By default, "History" and "What links here" are already in this menu.
- Once you have added a tool to the toolbar, you can use the previously mentioned arrow buttons to drag the tool into your My Tools menu.
- The My Tools folder is the one element that can't be renamed, moved, or deleted from the toolbar. It will always be at the bottom of the toolbar customization list. However, if you remove everything from within it, it will disappear - but will reappear if you add something back into it.
Tools you can add to your toolbar
See also
- Learn about notifications
- Learn about recent changes
Further help and feedback
- Browse and search other help pages at Help:Contents
- Check Fandom Community Central for sources of further help and support
- Check Contacting Fandom for how to report any errors or unclear steps in this article