Before you publish an edit to an article, it's a good idea to preview the changes you are making. That way, you know that everything looks the way you want it to, preventing you from having to go back and make more changes after you click Publish.
How do I preview changes?
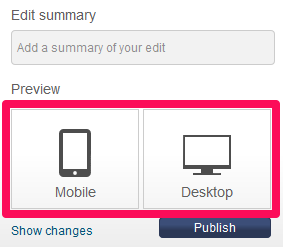
When you are in the editing screen for a page, you can see two main buttons on the right hand side: Preview and Publish. The Publish button saves the page, but, before you do that, you should know what the page looks like in case you need to make any corrections. To preview what your edit will look like on the page before publishing it, click the Preview button.
The preview screen that pops up after clicking Preview will show you exactly what the page will look like if you publish your current revision. The bottom of the preview box has a Publish button you can click if the page is ready to be saved, as well as a Back button if you need to return to the editor and make further changes.
Show changes option
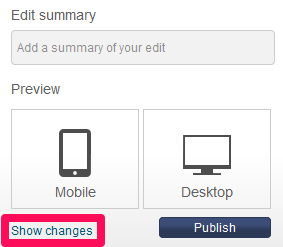
On the Preview button, you can find a drop down arrow that you can click. This leads you to an option that says Show changes.
If you click this, a page will appear highlighting the differences between your yet-to-be-saved version and the last saved version of the page. Some people find this easier to examine for errors and completeness than a simple preview. Like with the regular preview page, you can click Publish after showing changes to save your edits.
Why should I preview my edits?
Previewing your edits lets you include as many revisions you want to make as possible into one edit. The more edits you make in quick succession, especially to correct typos or formatting errors, the harder it is for other editors to check what changed between edits. That also fills up the page history with lots of minor edits.
See also
- Learn more about editing a Wikia wiki
- Learn about reverting an edit
- Learn about a page’s history
Further Help & Feedback
- Browse and search other help pages at Help:Contents
- Check Fandom Community Central for sources of further help and support
- Check Contacting Fandom for how to report any errors or unclear steps in this article