Tag: Help |
(.) Tags: Visual edit Help |
||
| (17 intermediate revisions by 8 users not shown) | |||
| Line 1: | Line 1: | ||
<jwplayer media-id="aSt7ckzR" /> |
<jwplayer media-id="aSt7ckzR" /> |
||
{{tocright}} |
{{tocright}} |
||
| + | '''Links''' are foundational to a wiki. They let your readers click from one page to another — and thus explore your content easily. It's such a central part of wikis that the process of creating links is also known as '''wikification .''' |
||
| − | {{Needs editor update}} |
||
| − | Adding '''links''' to your page is a helpful way to connect pages together, expand content, and help readers move through your wiki. |
||
| + | Make sure that all your pages have links to ''other'' pages on your wiki. However, not all links on a page need to go to other pages. |
||
| − | == Step by step == |
||
| + | |||
| ⚫ | |||
| + | == Using Fandom's visual editors == |
||
| − | [[File:Link dialog .png|thumb|right|300px|This is the pop-up that will appear when you click the link button.]] |
||
| + | [[File:Link dialog.png|thumb|right|300px|This is the pop-up that will appear when you click the link button in Fandom's [[help:classic editor|classic rich-text editor]] on [[Help:Unified_Community_Platform#Can_you_tell_whether_a_wiki_lives_on_the_UCP_or_lives_on_the_old_platform.3F|legacy]] wikis.]] |
||
| ⚫ | |||
| + | [[File:VisEdLinks.png|thumb|right|300px|In the [[help:VisualEditor|VisualEditor]], the process is similar, but there's only one field — for the target page. This field will accept either pages on the current wiki, as seen above, or URLs for external links.]] |
||
| + | [[File:Link dialog UCP.jpg|thumb|right|300px|Link Dialog on [[Help:UCP|UCP]] wikis]] |
||
| ⚫ | |||
* Begin by highlighting the text you want to link. |
* Begin by highlighting the text you want to link. |
||
| − | * Then click on the [[File:Link button.png]] button on the toolbar. |
+ | * Then click on the [[File:Link button.png]] button on the toolbar. |
| + | * A window will pop up which will allow you to create links. |
||
| − | * |
+ | ** In our classic rich-text editor, this window gives you two options for linking: an internal link or an external link. Internal links are pages within the wiki (or to another Fandom wiki). External links are to pages outside of Fandom. Select which one you need. |
| ⚫ | |||
| + | **In our VisualEditor, the window doesn't present options for linking. You can use the same field for either type of link. |
||
| ⚫ | |||
| ⚫ | |||
| ⚫ | |||
* Click "OK". Your link will appear! |
* Click "OK". Your link will appear! |
||
| + | {{clear}} |
||
| − | === Using source mode === |
||
| − | :''[[Help:Links/Wikitext|See here]] for more information about this approach.'' |
||
| − | In source mode, you will need to write links using [[Help:Wikitext|wikitext]]. (Note: writing the following in the [[Help:VisualEditor|visual editor]] will also make a link once the page is published.) |
||
| ⚫ | |||
| − | * Start by typing double opening square brackets where you want the link to go (<code><nowiki>[[</nowiki></code>) |
||
| + | [[help:source edit mode|Source editing]] differs significantly from the approach offered by Fandom's visual editors. However, it also allows you the ability to link in many more sophisticated ways via [[help:wikitext|wikitext]]. There are so many interesting details about linking in source that we've created [[Help:Links/Wikitext|a whole page about it!]] |
||
| − | * If the page you want to link to is part of the main content of the wiki, just start writing its name. If it is in another namespace, such as the Talk or Help namespaces, write the name of the namespace and a colon before the name of the page, (e.g. <code>Help:Links</code>). If you are ever unsure about what to write, go to the page you want to link to and copy the part in the page's URL after <code>/wiki/</code>. This will be the exact text you need for your link. |
||
| − | *Close the link using double closing square brackets (<code><nowiki>]]</nowiki></code>). You should finish with a link which looks like this: <code><nowiki>[[Help:Links]]</nowiki></code> |
||
| − | *If you want to change the text which is displayed when the link is shown, before the closing brackets, put a pipe and the text you want, so for example, <code><nowiki>[[Help:Common mistakes|things people often do wrong]]</nowiki></code> looks like: [[Help:Common mistakes|things people often do wrong]]. Tip: If you are linking to a page that is not in the main namespace and you don't want the namespace to show, place a single pipe before the closing brackets. This will make <code><nowiki>[[Help:Infobox|]]</nowiki></code> look like this: [[Help:Infobox|Infobox]]. |
||
| + | == Important notes == |
||
| − | ==== Linking to an external page ==== |
||
| + | * Until you're confident making links, don't forget to [[help:preview|preview]] your changes before you save. |
||
| − | Write a single opening square bracket, then the URL of the page (including the https:// part) followed by a space, the text you want displayed, and a single closing square bracket. So, for example, <code><nowiki>[https://google.com Google]</nowiki></code> will look like this: [https://google.com Google]. |
||
| ⚫ | |||
| − | |||
| − | == Types of internal links == |
||
| − | An '''internal link''' is a link that goes from one page on a wiki to another, and can be in any of the following forms: |
||
| − | # To link to an '''article page''', just enter the name of the article in the link field. |
||
| − | #* Example: ''Season One'' |
||
| − | # To link to a '''page in a namespace''', enter the name both the namespace and the page in the link field, with a colon (":") between them. This should match how the same text appears at the end of that page's URL. |
||
| − | #* Example: ''Characters:Joe_Smith'' |
||
| − | |||
| − | == Interwiki links == |
||
| − | To link to a '''page on a different community''', enter "w:c:" followed by the domain of that wiki, followed by the page's name. |
||
| − | * Example: ''w:c:community:Special:Forum (''<span style="font-style: normal; ">this links to the </span>[[homepage:w:Special:Forum|Community Central Forums]]). |
||
| − | * [[w:|Community Central]] can be linked by just "w:" followed by the namespace and pagename. |
||
| − | * Example: ''w:Help:Spam (''<span style="font-style: normal; ">this links to the </span>[[w:Help:Spam|Spam help page]]) |
||
| − | * In Community Central, you can enter "c:" instead of "w:c" in order to link to a page on a different community. Example: ''c:dev and w:c:dev'' result to [[c:dev]] and [[w:c:dev]], respectively. Both links work, but the first one will generate a [[Special:WantedPages|red link]] on all wikis except Community Central. |
||
| − | You can also link to [[wikipedia:Main Page|Wikipedia]] and [[mw:Main Page|MediaWiki]] using interwiki links. To do this, enter "wikipedia:" (for Wikipedia) or "mw:" (for MediaWiki), then enter the exact same name of a specific page from Wikipedia or MediaWiki. |
||
| − | * Example: ''wikipedia:Main Page'' (this links to the [[wikipedia:Main Page|main page of Wikipedia]]), or ''mw:Main Page'' (this links to the [[mw:Main Page|main page of MediaWiki]]). |
||
| − | More information about interwiki links can be found [[Help:Interwiki link|here]]. |
||
| − | |||
| − | == Advanced linking == |
||
| − | === Linking to a category or image === |
||
| − | When linking to a category for demonstrative purposes rather than for categorizing a page, or if you want to link to an image file page without the actual image showing, put a colon after the double opening square brackets, like this: <code><nowiki>[[:Category:Browse]]</nowiki></code> which will look like this: [[:Category:Browse]], and <code><nowiki>[[:File:Wiki-wordmark.png]]</nowiki></code> will look like this: [[:File:Wiki-wordmark.png]]. |
||
| − | |||
| − | === Linking to a page section === |
||
| − | If you want to link to a section of a page, make sure the page section is marked by a header. Then, at the end of your regular link, put a hash (<code>#</code>) followed by the section name. As an example, if you want to link to this section of this page, write <code><nowiki>[[Help:Links#Linking to a page section]]</nowiki></code> which will link as [[Help:Links#Linking to a page section]]. |
||
| − | |||
| − | === Linking from an image === |
||
| − | If you want to link to a page from an image, add a parameter to the image which says <code>link=Page name</code>. So, for example, <code><nowiki>[[File:Wiki-wordmark.png|thumb|center|Click the image|link=Help:Contents]]</nowiki></code> makes: |
||
| − | [[File:Wiki-wordmark.png|thumb|center|Click the image|link=Help:Contents]] |
||
| − | |||
| − | === Changing the color of an individual link === |
||
| − | If you want to change the color of one individual link (as opposed to every link on that wiki), you will need to use span tags and CSS on the pipe side of your link. |
||
| − | |||
| − | Using source mode, this means that if you were to, for example, make a link to Help:Contents green, you would write <code><nowiki>[[Help:Contents|<span style="color: green;">Help:Contents</span>]]</nowiki></code> which will look like: [[Help:Contents|<span style="color: green;">Help:Contents</span>]]. |
||
| − | |||
| − | === The pipe trick === |
||
| − | When using wikitext, the 'pipe trick' can be used to help write links more quickly. By placing a pipe (|) after certain strings of text, one can eliminate the need to type huge amounts of replacement text. For example, when typed on [[w:c:gameofthrones|Game of Thrones Wiki]], <code><nowiki>[[Pyke (island)|]]</nowiki></code> can be typed instead of <code><nowiki>[[Pyke (island)|Pyke]]</nowiki></code> to remove the end parenthetical. |
||
| − | |||
| − | === Link suggestions === |
||
| − | [[File:Linksuggest.png|thumb|350px|Link suggestions]] |
||
| − | When editing in source mode, a link suggestion feature will suggest the names of existing pages and files based on what you type. This is helpful if you cannot remember a precise name to create a link. |
||
| − | |||
| − | When you start typing a "<code>[[</code>" or "<code>{{</code>" and then some text, a pop-up will suggest items. So, for example, if you type "<code>[[File:S</code>" or <code>"{{s"</code> and then some text, it will suggest existing files or templates on your wiki that start with the letter S. |
||
| − | |||
| − | You can dismiss the link suggestions box by pressing the "Esc" key, and you can disable it entirely from the Editing tab of [[Special:Preferences]] by checking the "''{{int:tog-disablelinksuggest}}''" option. |
||
| − | |||
| − | == Remember == |
||
| − | * Preview your changes, and save when you are sure that you are finished. |
||
| ⚫ | |||
* Adding a link that goes to the current page appears as bold text instead of a link when viewing the page. |
* Adding a link that goes to the current page appears as bold text instead of a link when viewing the page. |
||
| − | == |
+ | == See also == |
| ⚫ | |||
| − | * How to [[Help:New page|create a new article]] |
||
| + | * [[Help:Interlanguage link]] for an important, specialised type of link |
||
| − | * How to [[Help:Profiles|use profile pages]] |
||
| ⚫ | |||
| − | * How to [[Help:Create an account|sign up for a username]] |
||
| ⚫ | |||
| ⚫ | |||
== Further help and feedback == |
== Further help and feedback == |
||
{{Help and feedback section}} |
{{Help and feedback section}} |
||
| − | |||
[[ar:مساعدة:وصلات]] |
[[ar:مساعدة:وصلات]] |
||
[[ca:Ajuda:Enllaços]] |
[[ca:Ajuda:Enllaços]] |
||
| Line 101: | Line 51: | ||
[[ro:Ajutor:Legături]] |
[[ro:Ajutor:Legături]] |
||
[[ru:Справка:Ссылки]] |
[[ru:Справка:Ссылки]] |
||
| + | [[tr:Yardım:Bağlantılar]] |
||
[[uk:Довідка:Посилання]] |
[[uk:Довідка:Посилання]] |
||
[[vi:Trợ giúp:Liên kết]] |
[[vi:Trợ giúp:Liên kết]] |
||
[[zh:Help:鏈接]] |
[[zh:Help:鏈接]] |
||
| + | |||
| ⚫ | |||
[[Category:Editing]] |
[[Category:Editing]] |
||
[[Category:Link help]] |
[[Category:Link help]] |
||
| ⚫ | |||
Revision as of 15:08, 12 January 2021
Links are foundational to a wiki. They let your readers click from one page to another — and thus explore your content easily. It's such a central part of wikis that the process of creating links is also known as wikification .
Make sure that all your pages have links to other pages on your wiki. However, not all links on a page need to go to other pages.
Using Fandom's visual editors
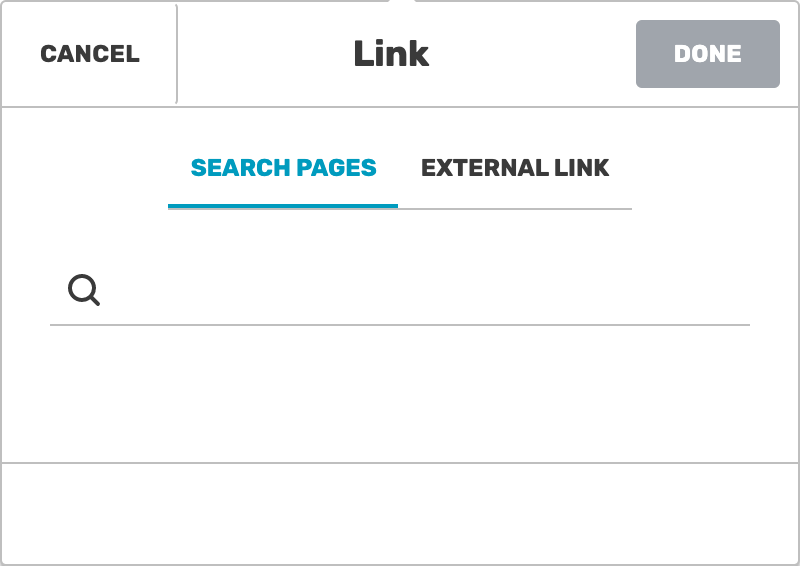
This is the pop-up that will appear when you click the link button in Fandom's classic rich-text editor on legacy wikis.

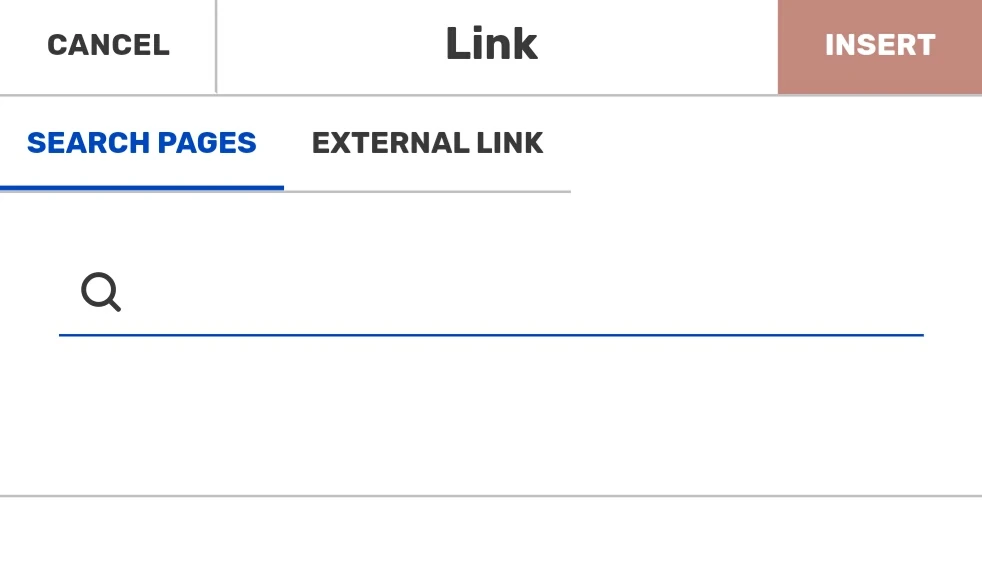
In the VisualEditor, the process is similar, but there's only one field — for the target page. This field will accept either pages on the current wiki, as seen above, or URLs for external links.
Link Dialog on UCP wikis
To create a link, click on the edit button and follow these instructions:
- Begin by highlighting the text you want to link.
- Then click on the
 button on the toolbar.
 - A window will pop up which will allow you to create links.
- In our classic rich-text editor, this window gives you two options for linking: an internal link or an external link. Internal links are pages within the wiki (or to another Fandom wiki). External links are to pages outside of Fandom. Select which one you need.
- In our VisualEditor, the window doesn't present options for linking. You can use the same field for either type of link.
- Enter the target of the link. For an internal link, enter the name of the page. For an external link, enter the full URL (including the "https://" part).
- Make sure the text that should display for the link looks right. It should be displaying the text you highlighted earlier.
- Click "OK". Your link will appear!
Using source mode
Source editing differs significantly from the approach offered by Fandom's visual editors. However, it also allows you the ability to link in many more sophisticated ways via wikitext. There are so many interesting details about linking in source that we've created a whole page about it!
Important notes
- Until you're confident making links, don't forget to preview your changes before you save.
- On most wikis, if your new link is red in the preview, either that destination does not exist or you typed it incorrectly. If you click on the red link, you will be asked to create the page.
- Adding a link that goes to the current page appears as bold text instead of a link when viewing the page.
See also
- Help:Interwiki link for more advanced linking details
- Help:Interlanguage link for an important, specialised type of link
- Help:Links/Wikitext for a source-only approach to linking
Further help and feedback
- Browse and search other help pages at Help:Contents
- Check Fandom Community Central for sources of further help and support
- Check Contacting Fandom for how to report any errors or unclear steps in this article