mNo edit summary Tags: Help rte-source |
Tags: Help rte-wysiwyg |
||
| Line 20: | Line 20: | ||
Congratulations on adding your first infobox! |
Congratulations on adding your first infobox! |
||
| − | Alternatively, you can add an infobox through source mode on an article by copying the syntax on the template's documentaton page (found at the bottom of the infobox template's page) and pasting it at the top of an article, changing the words after the equals signs to provide the information needed. |
+ | Alternatively, you can add an infobox through source mode on an article by copying the syntax on the template's documentaton page (found at the bottom of the infobox template's page) and pasting it at the top of an article, changing the words after the equals signs to provide the information needed. For example: |
<pre> |
<pre> |
||
{{infobox character |
{{infobox character |
||
Revision as of 19:53, 5 September 2015
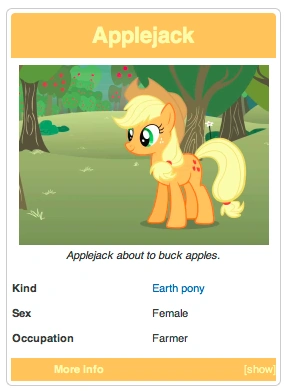
A sample infobox
Infoboxes are like fact sheets, or sidebars in magazine articles, designed to present a summary of the topic of the page. They present important points in an organized and quickly readable format. The sections of an infobox are usually the same from article to article to create consistency across the wikia. Infoboxes are made with templates.
Note: a new way to write infoboxes is currently being developed. See Help:PortableInfoboxes for more information.
Step by step
Wikias generally come with built-in infobox templates that can be customized to fit the style and content of the wikia and topic. Here's how to get started.
- Open an article page for editing in visual mode.
- In the right rail under the "Templates" section, choose the "Infobox" option. It will open a popup window for editing the content of your infobox.
- The fields in the infobox may vary from wikia to wikia, but here are some generally standard options:
- Title - the name at the top of your infobox. Generally also the title of the page. For example: Bob
- Image - the name of the (previously uploaded) image you would like to appear in your infobox. For example: Flower.jpg
- Imagewidth - the width (in pixels) of the image as you would like it to display. For example: 300px
- Row 1 info - the content for the first row of information. For example: Human
- Fill out the content to the best of your knowledge, and click "Preview" to see your work.
- When you're ready to add the infobox, click "OK" on the infobox editor, and then "Publish" on your page.
Congratulations on adding your first infobox!
Alternatively, you can add an infobox through source mode on an article by copying the syntax on the template's documentaton page (found at the bottom of the infobox template's page) and pasting it at the top of an article, changing the words after the equals signs to provide the information needed. For example:
{{infobox character
 | title         = Flowa
 | image         = Example.jpg
 | imagecaption  = Flowa, at rest
 | position      = Legal Secretary
 | age           = 2 months
 | status        = Active
 | height        = 5 inches
 | weight        = 20 grams
}}
You can adjust the code that manages your infobox by editing the source of your infobox. If you're using the standard infobox template, this page will be at Template:Infobox on your wiki.
Customizing a New Infobox
When you start a new wiki, there are already some infoboxes created with some default parameters. Chances are, those aren't going to be exactly the parameters you need. So, how do you customize them to suit your wiki?
First, you need to know how not to customize an infobox. Many new users mistake the code in the section above for the code which creates the infobox, but the trouble with this is that that code isn't for creating an infobox, but for calling one for use on another page. That code basically says "I want to take the contents of 'Template:Infobox character' and put it on this page, and I want to fill in these attributes with this information". It doesn't give the information to create the template itself, but rather brings the code for the template which is stored elsewhere to the page you're putting it on.
Let us look at how to customize the most basic of infoboxes; the one which goes by the name of Template:Infobox on every wiki. It works the same with all the other infoboxes, but this one's the easiest to start with.
Go into edit mode and you will see a lot of code on the page. If you're reading this, chances are a lot of it won't make any sense to you, and for the most part you can ignore those bits. You just need to focus on this part of the template:
|-
! colspan="2" | <div class="wikia-infobox-section-header">Some attributes</div>

|-
! First
| {{{first|''Unknown''}}}

|-
! Second
| {{{second|''Unknown''}}}

|-
! Third
| {{{third|''Unknown''}}}

|-
! colspan="2" | <div class="wikia-infobox-section-header">Other attributes</div>

|-
{{#if: {{{fourth|}}} |
! Fourth
{{!}} {{{fourth}}}
| }}

|-
{{#if: {{{fifth|}}} |
! Fifth
{{!}} {{{fifth}}}
| }}

|-
{{#if: {{{sixth|}}} |
! Sixth
{{!}} {{{sixth}}}
| }}
First, Second, Third, Fourth, Fifth, and Sixth are all place-holder names ready for you to change them to whatever you want, while "Some attributes" and "Other attributes" are also place-holder heading names which you can change at will. But let's start with changing the default attributes.
These are the attributes that above follow this format:
|-
! First
| {{{first|''Unknown''}}}
The First that is capitalised is the name that will appear beside the attribute once the page is published, and the first which is uncapitalised is the name of the attribute as you place it in the code to put it on a page. You can change these to anything you want, and the same goes for Second/second and Third/third. Let's give an example:
|-
! Date of Birth
| {{{dob|''Unknown''}}}
That specific piece of code there could be called by doing the following:
{{Infobox
 | dob        = 11/23/1963
}}
Which will look like this:
| Unknown | |
|---|---|
Some attributes
| |
| Date of Birth | 11/23/1963 |
Other attributes
| |
Like how the First, Second and Third attributes are currently lined up, you can add more default attributes by copy/pasting that structure and just changing the place-holder names to the names you want, eg:
|-
! colspan="2" | <div class="wikia-infobox-section-header">Some attributes</div>

|-
! Date of Birth
| {{{dob|''Unknown''}}}

|-
! Place of Birth
| {{{birthplace|''Unknown''}}}

|-
! Occupation
| {{{occupation|''Unknown''}}}

|-
! Family
| {{{family|''Unknown''}}}
After the default attributes are the ones that are only included if they are relevant to the page they're being put on. Let's say that some of your characters go by nicknames and you want to put an alternative name attribute in the infobox, but not all characters have alternative names so you don't want to have the attribute shown on all pages. That's when you alter the attributes that look like this:
|-
{{#if: {{{fourth|}}} |
! Fourth
{{!}} {{{fourth}}}
| }}
As in the previous examples, the capitalised Fourth is the name which will appear beside the attribute, and the lowercase fourth is the one with which you tell the template what information to use. In this case, however, you need to make sure that whatever you put in the first lowercase fourth's position is exactly the same as you place in the second lowercase fourth's position, eg:
|-
{{#if: {{{aka|}}} |
! Also Known As
{{!}} {{{aka}}}
| }}
These are called the same way as the other attributes, but if there is no information given, they just simply won't show up. You can put them anywhere the other kind of attribute can go, in any order or mixture.
The final things are the "Some-" and "Other attributes" which are in the headings of each section of the infobox. Just change those names to whatever you want, leaving the rest of the code in place. You can also take the second one out if you don't need it, or add a third in by copying the code of the first two and pasting it where needed, changing the name as you please.
So let's put this all together to see what we've got. The original part of the template I told you to look at now looks like this:
|-
! colspan="2" | <div class="wikia-infobox-section-header">Basic info</div>

|-
{{#if: {{{aka|}}} |
! Also Known As
{{!}} {{{aka}}}
| }}

|-
! Date of Birth
| {{{dob|''Unknown''}}}

|-
! Place of Birth
| {{{birthplace|''Unknown''}}}

|-
! Occupation
| {{{occupation|''Unknown''}}}

|-
! Family
| {{{family|''Unknown''}}}
Because we left the other parts alone, there are also some things there which can be called in the template. The above, when combined with the remaining template, would be called like this:
{{Infobox
 | title          = John Smith
 | image          = Example.jpg
 | imagecaption   =
 | imagewidth     =
 | aka            = The Doctor
 | dob            = 23 November, 1963
 | birthplace     = Gallifrey
 | occupation     = Scientist
 | family         = Susan (granddaughter)
}}
and look like this:
| John Smith | |
|---|---|
| |
Basic info
| |
| Also Known As | The Doctor |
| Date of Birth | 23 November, 1963 |
| Place of Birth | Gallifrey |
| Occupation | Scientist |
| Family | Susan (granddaughter) |
Congratulations! You have just customised your first infobox! Changing how the infobox looks requires CSS, which you can learn more about here or here.
Advanced customization
Some communities create elaborate infoboxes with advanced custom CSS and template code work. All code is publicly available on Wikia, so you can simply look at their template files to see how they created it, and borrow ideas for your own infoboxes.
If you need help with technical details, you can ask for advice from other users who've edited infoboxes successfully before, or raise a question in our {{#NewWindowLink:http://forums.wikia.com%7CCommunity Forums}}.
Examples
- {{#NewWindowLink:http://starter.wikia.com/wiki/Template:Infobox%7CTemplate:Infobox}} framework template, from the Starter Wiki (the basis for all new wikis).
- {{#NewWindowLink:http://templates.wikia.com/wiki/Template:Infobox%7CTemplate:Infobox}} from the Template repository.
- {{#NewWindowLink:http://wow.wikia.com/wiki/Template:Infobox game|Template:Infobox game}} on WoWWiki.
See also
- {{#NewWindowLink:http://c.wikia.com/wiki/User_blog:Rappy_4187/Guide_to_Infoboxes%7CRappy 4187's guide to infoboxes}}
- Help:Infobox on Wikipedia
- Help:Templates
- Help:PortableInfoboxes