No edit summary Tags: apiedit Help |
(Undo revision 2986833 by BaRaN6161TURK (wall)) Tag: Help |
||
| (41 intermediate revisions by 22 users not shown) | |||
| Line 1: | Line 1: | ||
| − | You can upload an '''avatar''' to represent yourself on all of Fandom's communities. It will appear in several locations |
+ | You can upload an '''avatar''' to represent yourself on all of Fandom's communities. It will appear in several locations and gives users another way to identify themselves to others. |
| − | |||
| ⚫ | |||
| ⚫ | |||
| − | |||
| ⚫ | |||
| ⚫ | |||
| + | === Desktop === |
||
| ⚫ | |||
| ⚫ | |||
# Save your chosen image to your computer (if not there already). |
# Save your chosen image to your computer (if not there already). |
||
# Go to your [[Special:MyPage|user page]]. |
# Go to your [[Special:MyPage|user page]]. |
||
| Line 13: | Line 12: | ||
# Click the "Save, I'm Done" button to save your avatar. |
# Click the "Save, I'm Done" button to save your avatar. |
||
| − | === |
+ | === Fandom app === |
| + | [[File:Fandom app editing profile.png|thumb|250px|When editing a profile in the app, the blue camera icon allows you to change your avatar.]] |
||
| ⚫ | |||
| + | To upload an avatar for your profile using the [[Help:Fandom app|Fandom app]]: |
||
| ⚫ | |||
| + | # Save your chosen image to your device (if not there already). |
||
| − | * The "Edit avatar" link appears only in the default skin, not in the MonoBook skin. MonoBook users will first have to visit their [[Special:Preferences|preferences]] and switch to default. |
||
| + | # Go to your user profile via the profile button on the right in the bottom bar. |
||
| + | # Tap the pencil icon on the top right part of the screen. |
||
| + | # Tap the camera icon next to your current avatar and choose your image. |
||
| + | # Crop or select the area of your image you want to be seen. |
||
| + | # Tap the check mark on the top right corner of the screen. |
||
| + | # Then, tap "Save" on the top right corner to save your avatar. |
||
| − | == |
+ | === Notes === |
| ⚫ | |||
| + | ** Of course, 500kb is pretty small. Most phone cameras by default take images that are much, much larger. If you want to use an image you've taken on your phone, you'll likely have to run it through an image editor or a compressor to lower its size. |
||
| ⚫ | |||
| + | * Changing avatars is known to cause problems on mobile devices. If you cannot change it, use a computer or [[Special:Contact/general|contact Fandom]]. |
||
| + | ** You currently can't use '''''Safari''''' for iOS to upload an avatar. But there are plenty of other ways for you to use your iOS device to upload avatars. You can use another iOS browser like Firefox or Chrome. Or you can use the [[Help:Fandom app|Fandom app]] or one of our [[Help:Community Apps|community apps]] to change your avatar. |
||
| + | |||
| + | == Avatar locations == |
||
Your avatar will show up: |
Your avatar will show up: |
||
| ⚫ | |||
| − | |||
| + | * Next to your messages in [[Help:Chat|chat]]. |
||
| ⚫ | |||
| − | * Next to your |
+ | * Next to your [[Help:Blogs|blog]] comments. |
| + | * Next to your posts on the [[Help:Forum|forums]], [[Help:Message Wall|message walls]], [[Help:Comments|comments]], and [[Help:Discussions|Discussions]]. |
||
| − | * Next to your blog comment. |
||
| − | * Next to your |
+ | * Next to your entries on the sidebar of the [[Help:Community Page|Community Page]]. |
| − | * On the "Top Contributors" section at the bottom of every page you are one of the top 5 editors in. |
||
| − | |||
Choose your avatar wisely! |
Choose your avatar wisely! |
||
| − | Note: On mobile devices like iOS, JPEG image files will not work. |
||
| − | ==See also== |
+ | == See also == |
| − | *[[Help:Profiles]] - Manage other parts of your |
+ | * [[Help:Profiles]] - Manage other parts of your user profile |
| − | *[[Help:Preferences]] - Manage your user preferences on Fandom |
+ | * [[Help:Preferences]] - Manage your user preferences on Fandom |
| − | ==Further |
+ | == Further help and feedback == |
{{Help and feedback section}} |
{{Help and feedback section}} |
||
| + | [[be:Даведка:Аватары]] |
||
| − | |||
| − | |||
[[ca:Ajuda:Avatars]] |
[[ca:Ajuda:Avatars]] |
||
[[de:Hilfe:Avatare]] |
[[de:Hilfe:Avatare]] |
||
| Line 48: | Line 56: | ||
[[pt:Ajuda:Avatares]] |
[[pt:Ajuda:Avatares]] |
||
[[ru:Справка:Аватары]] |
[[ru:Справка:Аватары]] |
||
| + | [[tr:Yardım:Avatarlar]] |
||
| + | [[uk:Довідка:Аватари]] |
||
[[zh:Help:頭像]] |
[[zh:Help:頭像]] |
||
[[Category:Help]] |
[[Category:Help]] |
||
Revision as of 19:56, 6 February 2020
You can upload an avatar to represent yourself on all of Fandom's communities. It will appear in several locations and gives users another way to identify themselves to others.
Step-by-step
Desktop

After selecting the image to use as your new avatar!
To upload an avatar for your profile while on desktop:
- Save your chosen image to your computer (if not there already).
- Go to your user page.
- Mouse over your current avatar, then click the "Edit avatar" link that appears.
- Press the "Choose file" button and choose your image.
- Observe the preview of your avatar and decide if that's how you want it.
- Click the "Save, I'm Done" button to save your avatar.
Fandom app
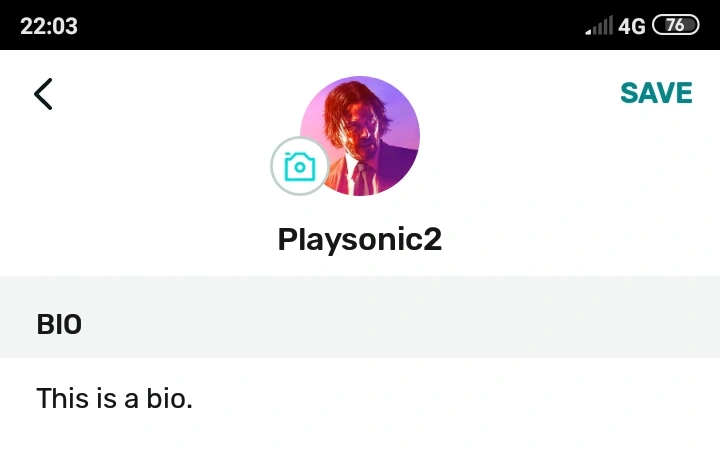
When editing a profile in the app, the blue camera icon allows you to change your avatar.
To upload an avatar for your profile using the Fandom app:
- Save your chosen image to your device (if not there already).
- Go to your user profile via the profile button on the right in the bottom bar.
- Tap the pencil icon on the top right part of the screen.
- Tap the camera icon next to your current avatar and choose your image.
- Crop or select the area of your image you want to be seen.
- Tap the check mark on the top right corner of the screen.
- Then, tap "Save" on the top right corner to save your avatar.
Notes
- Your image must be a JPEG, PNG, or GIF, and it must be less than 500kb in size. It's best that the image is 150x150 pixels or larger. GIF image files (and animated PNGs) do not animate.
- Of course, 500kb is pretty small. Most phone cameras by default take images that are much, much larger. If you want to use an image you've taken on your phone, you'll likely have to run it through an image editor or a compressor to lower its size.
- After you upload your new avatar, you can switch back to one of the default ones by clicking on one of them and hitting "Save, I'm Done". (Note: after doing this, switching to a custom avatar will require a new upload.)
- Changing avatars is known to cause problems on mobile devices. If you cannot change it, use a computer or contact Fandom.
- You currently can't use Safari for iOS to upload an avatar. But there are plenty of other ways for you to use your iOS device to upload avatars. You can use another iOS browser like Firefox or Chrome. Or you can use the Fandom app or one of our community apps to change your avatar.
Avatar locations
Your avatar will show up:
- On the header at the top of your user page.
- Next to your messages in chat.
- Next to your blog comments.
- Next to your posts on the forums, message walls, comments, and Discussions.
- Next to your entries on the sidebar of the Community Page.
Choose your avatar wisely!
See also
- Help:Profiles - Manage other parts of your user profile
- Help:Preferences - Manage your user preferences on Fandom
Further help and feedback
- Browse and search other help pages at Help:Contents
- Check Fandom Community Central for sources of further help and support
- Check Contacting Fandom for how to report any errors or unclear steps in this article