m (→Further Help and Feedback: Removing be: links) Tags: apiedit Help rollback |
m (Bot: Adding be:Даведка:Аватары) Tags: apiedit Help |
||
| Line 36: | Line 36: | ||
{{Help and feedback section}} |
{{Help and feedback section}} |
||
| + | [[be:Даведка:Аватары]] |
||
[[ca:Ajuda:Avatars]] |
[[ca:Ajuda:Avatars]] |
||
[[de:Hilfe:Avatare]] |
[[de:Hilfe:Avatare]] |
||
Revision as of 01:18, 16 July 2017
You can upload an avatar to represent yourself on all of FANDOM's communities. It will appear in several locations, and gives users another way to identify themselves to others.
Step by step

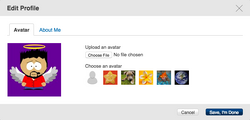
After selecting the image to use as your new avatar!
To upload an avatar for your profile:
- Save your chosen image to your computer (if not there already).
- Go to your user page.
- Mouse over your current avatar, then click the "Edit avatar" link that appears.
- Press the "Choose file" button and choose your image.
- Observe the preview of your avatar and decide if that's how you want it.
- Click the "Save, I'm Done" button to save your avatar.
Notes
- Your image must be a jpeg, png, or gif, and it must be less than 500kb in size. It's best that the image is 150x150 pixels or larger. Animated images do NOT work.
- After you upload your new avatar, you can switch back to one of the default ones by clicking on one of them and hitting "Save, I'm Done".
- The "Edit avatar" link appears only in the default skin, not in the MonoBook skin. MonoBook users will first have to visit their preferences and switch to default.
Avatar locations
Your avatar will show up:
- On the header at the top of your userpage.
- Next to your name in Special:Chat.
- Next to your blog comment.
- Next to your replies on the forums and message walls.
Choose your avatar wisely! Note: On mobile devices like iOS, JPEG image files will not work.
See also
- Help:Profiles - Manage other parts of your User Profile
- Help:Preferences - Manage your user preferences on FANDOM
Further Help and Feedback
- Browse and search other help pages at Help:Contents
- Check Fandom Community Central for sources of further help and support
- Check Contacting Fandom for how to report any errors or unclear steps in this article
